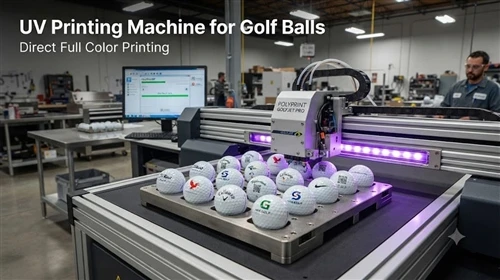
A UV printing machine for golf balls lets you put full-color logos, names, photos and QR codes directly onto a dimpled sphere - no plates, no minimum order, no waiting for ink to dry. This guide walks through the whole picture: how UV curing works on a curved surface, how to choose between direct UV printing, UV DTF and pad printing, what a realistic golf ball printing machine cost looks like, how to prepare Surlyn and urethane covers so ink actually sticks, the exact print workflow, durability testing, troubleshooting, and the numbers behind a profitable custom golf ball business.

Can a UV Printer Really Print on Golf Balls?
Yes - but a golf ball is one of the harder substrates in the personalization market, and it is worth understanding why before you buy anything.
A UV flatbed printer jets tiny ink droplets onto the surface, and UV LED lamps cure them within a second or two through a photochemical reaction. Liquid becomes solid film almost instantly, so the ink has no time to sag or run down the curve. That instant cure is exactly what makes UV technology viable on a sphere where solvent or water-based inks would pool inside the dimples.
Curing speed is rarely the problem. Two other things are:
- Adhesion. Golf ball covers are engineered to be slick. Surlyn and urethane both carry a low-friction clear coat that resists exactly the kind of chemical bonding UV ink needs.
- Geometry. The printhead sits at a fixed height. On a 42.7 mm sphere, the surface drops away fast - beyond roughly a 25–30 mm wide window, droplet placement degrades and the image starts to blur or stretch.Solve those two and everything else is process control.
The Realistic Print Area on a Golf Ball
Without rotation, plan for a usable zone of about 20–30 mm across the top of the ball - enough for a club logo, a monogram, a short name, a number, or a QR code. Full 360-degree wraps require a rotary axis and are a different production problem entirely. Most commercial orders never need one.

UV Direct vs UV DTF vs Pad Printing: Which Technology Fits Your Orders?
Choosing custom golf ball printing equipment starts with order profile, not with resolution specs. Ask one question: are you printing the same design ten thousand times, or ten thousand different designs?
| Method | How it works | Best for | Weak points |
|---|---|---|---|
| UV direct (flatbed + jig) | Balls sit in a multi-cavity jig; printheads pass over and UV LEDs cure instantly | Variable data, photos, one-offs, 1–500 ball orders | Limited print window; needs accurate height calibration |
| UV direct (rotary axis) | Ball spins under a fixed head for wider or wrapped coverage | Premium branding, wrap-style graphics, resort and pro-shop work | Slower per ball; more setup per job |
| UV DTF transfer | Design printed on film, then transferred and adhered to the ball | Complex artwork, low equipment budget, decorative/display balls | Adhesive layer is the weak link under repeated club impact |
| Pad printing | Silicone pad lifts ink from an etched plate onto the ball | Thousands of identical logo balls | New plate per design; slow color changes; poor fit for personalization |
How Much Does a Golf Ball Printing Machine Cost?
Prices vary by printhead brand, ink channel count and build quality far more than by print size.
- Entry-level desktop UV printer (A3/A4 class): roughly $3,000–$8,000. Suitable for Etsy sellers, gift shops and local club orders. See the A3 UV printer class of machine for this tier.
- Professional flatbed with rotary and white ink: roughly $10,000–$30,000. This is where most serious customization businesses land - faster passes, better nozzle reliability, real service support. The A1 UV printer 9070 and DG-2513 UV printer sit in this range.
- Industrial systems: $50,000 and up, for high-volume promotional manufacturing with automated loading.
Budget separately for: rotary or spherical attachment ($500–$2,000), custom multi-ball jigs ($200–$500), starting ink and cleaning consumables ($300–$1,000), and a workstation with RIP software. A realistic all-in startup figure is $5,000–$12,000.
Feature Checklist Before You Buy
- Rotary or spherical fixture support, with adjustable diameter
- Multi-ball jig capability (12–24 balls per pass changes your economics dramatically)
- White ink channel - mandatory for colored, matte or yellow balls
- Optional varnish channel for gloss and scratch resistance
- Automatic or repeatable height calibration
- UV LED curing (cool-running; safer for urethane covers than mercury lamps)
- RIP software that handles variable data without manual re-layout
- Local or remote technical support, plus available printhead spares
The cheapest machine on the listing page is rarely the cheapest machine to own. A clogged or damaged printhead can cost a significant fraction of an entry-level printer's price.
Surface Preparation: Where Most Golf Ball Prints Fail
Ask any experienced operator what kills a job and the answer is almost never the printer. It is adhesion.
Step 1 - Clean Properly
- Wipe with 70–99% isopropyl alcohol on a lint-free microfiber cloth.
- Let the surface flash off completely - printing onto damp IPA traps solvent under the ink.
- Handle balls by the sides or with gloves afterward. Fingerprint oil alone is enough to cause peeling.
Step 2 - Match the Treatment to the Cover Material
Surlyn (ionomer) balls - the harder, chemically resistant cover used on most recreational balls. Low surface energy means poor natural bonding. Use an adhesion promoter or, in a production shop, corona or plasma treatment to raise surface energy before printing. Select an ink formulated for hard plastics.
Urethane balls - softer premium covers such as Titleist Pro V1. The cover flexes on impact, so a rigid ink film cracks. Use a flexible UV ink, keep the ink layer thin, and avoid over-curing: excessive UV dose makes the film brittle and it will spider-crack after a few strikes.
Step 3 - Used and Recycled Balls
Reclaimed balls need more work: remove grass and dirt, wash with a mild detergent, degrease, dry fully, then apply adhesion promoter. Any residual pond scum or turf chemical will show up as a failed print two weeks later, not on day one.
Safety Note
UV ink cures without solvent evaporation, but cleaners, primers and clear coats do release VOCs. Use local exhaust ventilation, gloves and eye protection, keep UV lamps shielded, and read the SDS for every chemical in the workflow.
The Golf Ball Printing Workflow, Step by Step
This is the sequence a production shop follows for a repeatable result on a UV flatbed printer.
- Prepare artwork. Build in vector (AI, EPS, SVG, PDF). Keep critical elements near the center of the print zone, thicken thin strokes, increase spacing between small elements, and avoid gradients that span the whole visible area.
- Clean and treat the balls. IPA wipe, dry, adhesion promoter if the cover requires it.
- Load the jig. Seat each ball fully; a few millimeters of height variation across a 24-ball tray produces visibly different results from row to row.
- Calibrate print height. Set head clearance to the top of the ball, not to the jig surface. Verify with a single test ball before committing the tray.
- Print white base, then CMYK. White first on colored, yellow or matte balls. Thin multiple passes beat one heavy pass - thick ink pools in the dimples and dries with an orange-peel texture.
- Apply varnish if specified, then final cure. Unidirectional printing generally gives cleaner edges on curved surfaces than bidirectional.
Starting Parameters for Testing
- UV lamp intensity: begin around 60–80% and adjust by adhesion result
- Speed: medium or slow for the first production runs
- Layering: 2–3 thin passes rather than one thick deposit
- Direction: single-direction for edge sharpness
Document the settings that work per ball brand. Titleist, Callaway and TaylorMade covers behave differently, and a profile that produces perfect results on one can fail on another. Browse real UV printing samples to see what output quality on curved and textured objects should look like.
Testing Durability Before You Sell
Golf balls get hit at 100+ mph, dragged through sand and left in wet grass. Test before a customer does.
- Tape/crosshatch test: press adhesive tape firmly onto the print and pull. Any ink lift means the surface prep or cure is wrong.
- Scratch test: controlled fingernail or coin pressure across the image.
- Water immersion: soak 24 hours, then repeat the tape test.
- Impact test: actually hit a sample ball off a mat several times and inspect for cracking.
- UV exposure: leave a sample outdoors for two weeks and check for fading.
Post-Print Protection
A compatible UV clear coat adds gloss and abrasion resistance and is worth it for premium corporate gifts and display pieces. Some shops use automotive clear spray as a cheaper alternative - it works, but it needs ventilation, adds thickness, and must be compatibility-tested first. Whatever coating you choose, keep the total added film thin so the ball's aerodynamics and feel are unchanged.
Troubleshooting: Common Problems and Fixes
| Symptom | Likely cause | Fix |
|---|---|---|
| Ink peels or flakes off | Contaminated surface, wrong ink, no primer, under-cure | Re-clean, add adhesion promoter, raise lamp intensity, switch to a plastics-rated flexible ink |
| Print cracks after impact | Rigid ink on urethane, or over-cure | Use flexible ink; reduce UV dose and ink thickness |
| Blurred or stretched image | Head-to-ball distance too great, ball not centered | Recalibrate height, tighten jig, shrink the design toward the center zone |
| Ink pooling in dimples | Too much ink per pass | Split into more, thinner passes |
| Colors off or dull | Missing or uneven white base, wrong ICC profile | Recalibrate, apply correct profile, check white ink circulation |
| Banding or missing colors | Clogged nozzles |
Run nozzle check and cleaning cycle; never leave the machine idle for long periods |
Daily Maintenance That Protects Your Margin
Downtime, not ink, is the real cost in this business. A short routine prevents most failures.
Before production: check ink levels, run a nozzle test, inspect UV lamps, verify jig alignment, print one test ball.
After production: clean ink residue from the platen and jig, cap or cover the head as instructed, store inks away from light and heat.
Environment: stable temperature, controlled humidity, and a dust-free room. Dust in a UV workshop becomes permanent - it cures into the ink film.
Never mix ink systems from different suppliers; incompatible chemistry causes color shifts, curing failures and, in the worst case, head damage. Detailed guidance is available in Dacen's printer maintenance resources and UV flatbed printer FAQ.
Turning Golf Ball Printing Into a Profitable Business
A Realistic Cost Model
- Blank golf ball: $1.00–$4.00 (recreational to premium)
- Ink, primer and coating: $0.05–$0.30 per ball
- Packaging: $0.20–$0.50 per ball or per sleeve
- Labor: dominated by handling, not printing - jig capacity is the lever
Worked example. Equipment $8,000 plus $2,000 in accessories and setup = $10,000 invested. Selling at $5 per personalized ball against $1.70 in materials gives $3.30 gross profit per ball. At 100 balls a day across 20 working days, that is roughly $6,600 gross monthly - before rent, marketing, returns and your own time. Treat that as an upper bound, not a forecast: the constraint in year one is almost always order flow, not printing capacity.
Pricing That Actually Holds
- Single personalized balls: $5–$15
- Corporate gift sets and sleeves: $30–$100+
- Tournament packages: tiered volume pricing, quoted per dozen
The highest margins are not in one-off consumer orders. They are in repeat B2B work: corporate branding, club and resort pro shops, charity tournaments, wedding favors and university merchandise. One recurring tournament account is worth more than a hundred Etsy sales.
Business Models by Stage
Home-based: one desktop machine, online storefront, local club relationships. Lowest risk entry.
Small studio: faster equipment plus multi-ball jigs, corporate and event accounts, inventory of blanks in two or three grades.
Production scale: multiple printers or a multi-station UV printing system, parallel prep stations, automated order intake and proofing.
Legal and Rules Considerations
Two separate issues, often confused:
- Trademark. Printing sports team logos, league marks or third-party brand logos for commercial sale requires authorization from the rights holder. Customer-supplied artwork should come with a warranty that they own or license it.
- Golf rules. Under the Rules of Golf, a player may mark a ball for identification, and manufacturer or promotional printing is generally acceptable. What matters is that markings must not be applied in a way that alters the ball's performance characteristics. Keep the coating thin and the geometry unchanged and standard logo printing is not an issue for normal play.
Key Takeaways
- UV printing works on golf balls; adhesion and print-window geometry are the real constraints, not curing.
- Choose UV direct for variable, low-volume, high-margin orders; pad printing only for large identical runs.
- Budget $5,000–$12,000 for a credible starting setup, including jigs, rotary and consumables.
- Surlyn needs adhesion promotion; urethane needs flexible ink and a lighter cure.
- Thin multiple passes beat one thick pass - always.
- Test tape, scratch, water and impact on every new ball brand before you take the order.
- Profit lives in repeat corporate and tournament accounts, not one-off consumer sales.
Getting Started
The fastest way to shorten the learning curve is to test before you invest: request sample prints on your own ball brands, compare jig and rotary options, and confirm that the supplier can provide ink, spare printheads and technical support in your region. Once your parameters are documented and your adhesion tests pass, a golf ball UV printer becomes a genuinely scalable customization business.
FAQ
Can a UV printer print on the dimpled surface of a golf ball?
Yes. With a proper jig or rotary attachment and correct head-height calibration, UV printers produce sharp full-color images on golf balls. The practical print window is about 20–30 mm across the top of the ball unless you use a rotary axis.
How much does a UV printing machine for golf balls cost?
Entry-level desktop machines run about $3,000–$8,000. Professional flatbed systems with rotary attachments and white ink typically cost $10,000–$30,000. Industrial lines start around $50,000.
What is the actual printing cost per golf ball?
Ink and coating usually cost between five and thirty cents per ball. The blank ball, packaging, labor and equipment depreciation are the meaningful costs - not the ink.
Do I need a rotary attachment for golf ball printing?
Not for logos, names, numbers and QR codes - a multi-ball flatbed jig handles those and is faster. A rotary axis is only necessary for wrapped or wide-coverage designs.
How do I get ink to stick to Surlyn versus urethane golf balls?
Surlyn is chemically resistant and needs surface activation or an adhesion promoter plus a plastics-rated ink. Urethane is soft and flexes, so it needs a flexible UV ink, thin ink layers and a moderate cure to prevent cracking.
Will printed graphics survive being hit?
Properly prepared and cured prints survive normal play, though wear appears over time on struck areas. Always run tape, water and impact tests on each new ball model before committing to a production order.
What design software and file formats work best?
Adobe Illustrator, CorelDRAW and Photoshop, exporting to AI, EPS, SVG or PDF. Vector artwork gives cleaner logos and text on curved surfaces than raster files.
Do I need a license to print team or brand logos?
Yes. Commercial use of protected trademarks requires permission from the rights holder or licensing body. Get written confirmation of rights for any customer-supplied logo.
Is a custom golf ball printing business actually profitable?
It can be, with gross margins commonly in the 60–70% range per ball. Profitability depends on securing repeat corporate, resort and tournament accounts rather than relying on one-off retail orders.