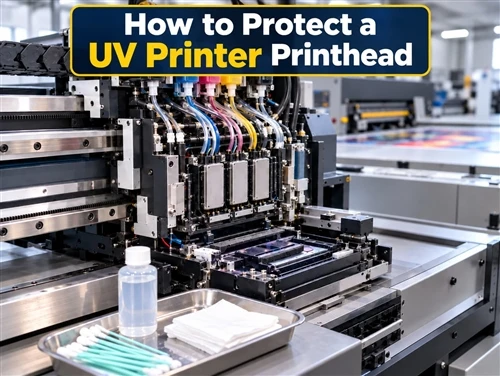


Proper UV printer printhead maintenance starts with inspection and a nozzle check, not with repeated aggressive cleaning. Before production, print a nozzle-test pattern, inspect every ink channel, and use the lightest approved recovery method when a defect appears. After maintenance, print another test to confirm whether the action improved the nozzle pattern.

The printhead must also be treated as part of a larger system. The capping station, wiper, flushing area, ink supply, negative-pressure system, white ink circulation, printhead height, and production environment can all affect nozzle performance. Cleaning the printhead repeatedly will not solve a damaged cap, unstable ink supply, air leak, incorrect pressure, or head strike.
This guide provides a diagnostic and maintenance framework for operators of UV flatbed printers and other UV inkjet equipment. Exact cleaning liquids, maintenance menus, power settings, approved contact areas, and shutdown procedures vary by printer model. The operating manual and supplier instructions for the specific machine should therefore take priority.
Technical scope: Operator-level inspection, routine maintenance, basic troubleshooting, shutdown preparation, and criteria for requesting service support. This article is not a replacement for a model-specific service manual.
Quick UV Printhead Maintenance Checklist
| When | Recommended action | Purpose |
|---|---|---|
| Before each production shift | Inspect the printer, ink system, work area, and nozzle-test pattern | Identify nozzle, ink-supply, or clearance problems before production |
| When a small nozzle defect appears | Run one normal or light cleaning cycle, then test again | Recover nozzles without unnecessary ink consumption |
| During long production runs | Monitor print quality, ink mist, product stability, and head clearance | Catch developing problems before they affect the full batch |
| At the end of the shift | Clean approved maintenance areas and confirm that the carriage is capped | Maintain effective wiping, flushing, and sealing |
| Weekly or at the specified interval | Inspect the cap, wiper, flushing area, waste path, carriage surroundings, and UV lamp area | Remove accumulated contamination and identify worn maintenance parts |
| Before extended downtime | Follow the printer-specific holiday or storage procedure | Reduce the risk of sedimentation, drying, blocked ink paths, and restart problems |
The basic maintenance principle is:
Inspect first, clean only as much as necessary, and verify every result with another nozzle check.
Why UV Printer Printhead Maintenance Matters
UV ink cures rapidly when exposed to ultraviolet energy. During printing, however, uncured ink mist and liquid residue can collect around the carriage, printhead frame, cap, wiper, flushing area, fixtures, and UV-LED window. If this contamination is allowed to harden, it can interfere with wiping, capping, ink discharge, carriage movement, and droplet placement.
Early printhead problems often appear as small changes rather than complete print failure. Typical warning signs include missing or deflected lines in the nozzle check, banding in solid colors, grainy gradients, unstable white ink coverage, repeated defects in the same nozzle positions, or excess ink around the printhead.
These symptoms should be investigated early. A useful overview of common nozzle-related problems is available in Dacen's guide to the causes and solutions of UV printer nozzle problems.
The Maintenance Station Is Part of the Printhead System

A printhead cannot maintain stable nozzle performance by itself. Several nearby components support cleaning and ink discharge:
- Cap top or capping station: Seals against the printhead when the carriage is parked and may support ink suction during cleaning.
- Wiper: Removes excess ink and contamination from approved printhead areas during automatic maintenance.
- Flushing area: Receives ink discharged to keep the nozzles active.
- Waste-ink path: Carries discharged ink away from the maintenance station.
If the cap cannot seal correctly, the cleaning system may be unable to draw ink evenly through the nozzles. A contaminated or deformed wiper can spread residue instead of removing it. A saturated flushing area can also increase contamination near the carriage path.
For that reason, persistent missing nozzles should not automatically be treated as a blocked printhead. The cap, wiper, flushing area, ink supply, and pressure system should be evaluated together.
How to Read a UV Printer Nozzle Check?
A nozzle check is the primary diagnostic record for printhead maintenance. It shows whether individual nozzles are firing, whether the droplet direction is stable, and whether an entire ink channel appears weak.
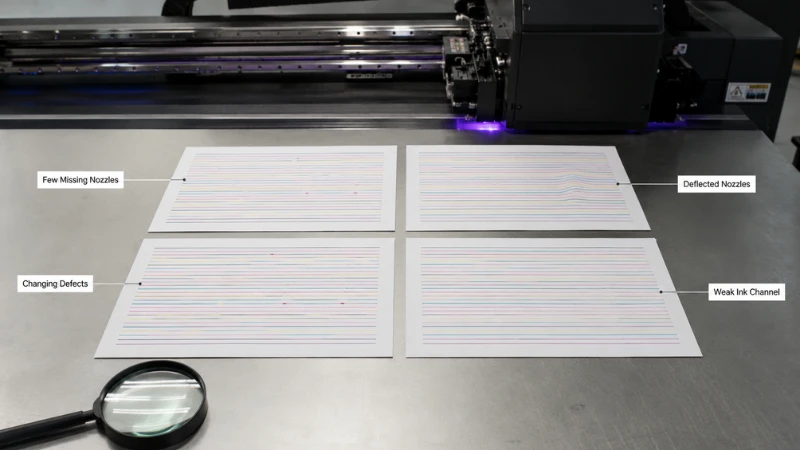
Dacen's article on UV flatbed printer nozzle cleaning provides additional context for nozzle recovery. When reading the test pattern, separate the defect into one of the following categories.
| Nozzle-check pattern | What it may indicate | First response |
|---|---|---|
| A few broken or missing lines | Temporary nozzle loss, minor contamination, or incomplete capping | Run one normal cleaning cycle and print another test |
| Lines are present but fire in the wrong direction | Nozzle deflection, contamination near the nozzle surface, or physical damage | Inspect the approved maintenance areas; avoid treating it as a simple missing-nozzle problem |
| The same lines remain missing after every cleaning | Persistent contamination, cap-sealing failure, physical nozzle damage, or an electrical issue | Stop repeating strong cleaning and investigate the maintenance station or request service support |
| The missing positions change after each test | Air, unstable ink supply, pressure fluctuation, or intermittent firing | Check ink levels, tubing, alarms, circulation, and the maintenance station |
| An entire channel is weak | Ink-supply restriction, pressure problem, circulation issue, damper or filter problem, or channel-level electrical fault | Check system warnings and request technical diagnosis if the problem persists |
| The pattern is good at startup but deteriorates during printing | Insufficient ink replenishment, air entry, filter resistance, pressure instability, or excessive ink demand | Pause production and investigate the ink-supply system rather than repeatedly cleaning |
| White ink alone is unstable | Pigment settling, circulation failure, restricted white ink path, or maintenance-station contamination | Confirm the approved circulation and agitation status before changing any settings |
Can Production Continue with One or Two Missing Nozzles?
There is no universal acceptance limit. The decision depends on the printer, ink channel, print mode, image content, pass count, and customer quality requirement.
A small nozzle defect may be hidden by a high-pass print mode in some images, but it can remain visible in solid colors, gradients, fine text, white underlayers, clear varnish, and embossed effects. White ink and varnish defects can also affect subsequent layers even when the color image initially appears acceptable.
Production should resume only when:
- The nozzle pattern meets the printer manufacturer's acceptance standard.
- The defect is stable rather than becoming progressively worse.
- A representative production test shows no visible banding, graininess, density change, or layer inconsistency.
- No leaking, dripping, abnormal sound, pressure alarm, or carriage problem is present.
Daily UV Printer Printhead Maintenance

1. Inspect the Printer and Work Area
Before loading a production file, inspect the print bed, fixtures, carriage path, and surrounding area. Remove dust, material fragments, loose tape, cured ink particles, and tools that could interfere with carriage movement.
Check the printable product for warped surfaces, raised edges, unsecured components, and incorrect fixture height. A small raised object can cause a head strike even when the nominal product thickness is correct.
The printer cover should remain closed during printing when required by the equipment manufacturer. This reduces contamination and protects the moving carriage.
2. Check the Ink and Waste Systems
Confirm that ink levels are sufficient, cartridges or tanks are installed correctly, and no ink, temperature, circulation, pressure, or waste-system alarm is active. Inspect visible tubing for persistent bubbles, discontinuous ink columns, or unusual movement.

White ink requires additional attention because its high pigment content makes it more sensitive to sedimentation. Confirm that the machine's circulation or agitation system is operating as designed. Dacen's white ink testing guidance provides related information.
Manual tank shaking, tube disconnection, pressure adjustment, or circulation-setting changes should be performed only when the procedure is specifically approved for the machine.
3. Print and Save a Nozzle Check
Print a nozzle-test pattern before production and inspect each channel. Saving the test creates a baseline that can later be compared with patterns printed after cleaning or during a fault.
Without a baseline, it is difficult to determine whether a production defect comes from the printhead, artwork, media, color settings, curing, mechanical alignment, or product movement.
4. Escalate Cleaning Gradually

When the nozzle check shows a minor defect, start with the lightest cleaning function recommended by the printer manufacturer.
- Print and save the original nozzle check.
- Run one normal or light cleaning cycle.
- Print another nozzle check.
- Compare the location and severity of the defects.
- If the problem remains, inspect the cap, wiper, flushing area, ink supply, and active alarms.
- Use a stronger automatic cleaning level only when the machine instructions recommend it.
- Perform approved manual maintenance if the automatic procedure does not restore the pattern.
- Request technical support when the same defect remains or the pattern becomes worse.
Cleaning and ink extraction are not necessarily the same operation. They may use different pump sequences, ink volumes, and service purposes. Dacen explains this distinction in its article on the difference between cleaning and ink extraction.
5. Confirm the Printhead Gap
Use the smallest safe printhead gap permitted for the product, fixture, and printer. An unnecessarily large gap allows droplets to travel farther, which can reduce placement accuracy and increase ink mist around the printhead and UV lamp.
The selected height must still provide safe clearance over the entire print path. Check the product thickness, raised edges, recessed areas, warping, fixture height, vacuum or clamping stability, and any screws or inserts above the intended surface.
A fixed gap value copied from another machine may be unsafe. The correct value depends on the carriage design, printhead, fixture, media shape, and application.
6. Monitor the Printer During Production
During long jobs, watch for new banding, color-density changes, uneven white ink, increased ink mist, material movement, ink drops, unusual carriage noise, and changes in curing.
If the print starts correctly but deteriorates after continued production, an ink-supply or pressure problem may be more likely than a permanently blocked nozzle. Repeated cleaning may temporarily hide the symptom without correcting the cause.
7. Complete End-of-Shift Maintenance
At the end of the shift, finish or cancel the current job correctly, remove products and fixtures, and enter the designated maintenance mode. Inspect the cap, wiper, flushing area, and approved surfaces around the printhead.
After cleaning, remove all tools, close the printer covers, finish maintenance mode, and confirm that the carriage returns to the correct capped position. Check for waste-ink or maintenance alarms before leaving the machine.
Further routine recommendations are available in Dacen's UV flatbed printer maintenance guide.
Weekly UV Printhead Maintenance
Weekly maintenance should go beyond repeating the daily routine. Its purpose is to remove accumulated residue, inspect parts that gradually wear, and identify conditions that automatic cleaning cannot correct.
"Weekly" should be treated as a planning interval rather than a universal rule. High-volume printing, high ink coverage, raised-object printing, excessive head gaps, dusty production areas, and frequent white ink use may require more frequent attention. A lightly used printer still requires scheduled care because inactivity can increase settling and drying risks.
Weekly Inspection Matrix
| Component | Clean or inspect | Signs that further action is needed |
|---|---|---|
| Cap top | Remove approved contamination and inspect the sealing edge | Hardened ink, fibers, deformation, uneven contact, poor recovery after cleaning, or visible misalignment |
| Wiper | Clean the approved surfaces and inspect its shape and movement | Cracks, curling, swelling, hardened deposits, poor movement, or repeated streaks of contamination |
| Wiper cleaner | Remove accumulated ink and fibers | Saturation, hardened residue, or contamination returning immediately to the wiper |
| Flushing area or sponge | Inspect ink buildup and waste drainage | Heavy saturation, raised deposits, overflow, poor drainage, or contamination close to the carriage path |
| Printhead surroundings | Clean only the areas identified in the maintenance instructions | Cured ink, hanging residue, fibers, or repeated ink buildup around the frame |
| Waste-ink system | Check capacity, tubing, alarms, and visible leaks | Blocked drainage, overflow, damaged tubing, or repeated waste-system alarms |
| Ink tubing and circulation | Inspect visible ink movement and white ink operation | Persistent bubbles, discontinuous ink columns, sediment, abnormal pump sound, or circulation warning |
| UV lamp or UV-LED window | Inspect after cooling and clean only with the approved material | Ink mist, dust, cured deposits, uneven curing, or reduced irradiation |
| Fixtures and print bed | Remove ink buildup and confirm that products sit flat | Raised adhesive, warped inserts, loose screws, or unstable clamping |
The cap, wiper, and flushing components should not be replaced solely because a generic time interval has passed. Replacement is usually triggered by the machine's schedule, visible damage, loss of sealing or wiping performance, saturation, or repeated nozzle problems that return after correct cleaning.
The UV lamp area may require a cleaning method different from the maintenance station. Dacen's guide to UV lamp maintenance for flatbed printers provides related information. A solvent approved for a lamp window should not automatically be used on the printhead, cap, or ink system.
How to Perform Manual Printhead Maintenance Safely?
Manual maintenance should be performed according to the printer's scheduled procedure or when normal automatic cleaning is insufficient. It should not be improvised as a repair method.
Prepare the Correct Tools
The required tools may include manufacturer-approved cleaning liquid, approved foam cleaning sticks, non-woven material, protective gloves, safety glasses, and replacement maintenance parts.
Use a clean tool for each maintenance section. A contaminated cleaning stick can move cured ink and debris from one component to another. Household cleaners, acetone, general-purpose solvents, and alcohol can damage seals, adhesives, dampers, coatings, and printhead components unless explicitly approved for that exact location.
Use the Correct Maintenance Mode
Move the carriage through the printer's control panel or software procedure. Pulling the carriage by force, releasing a lock without instructions, disabling a sensor, or reaching into an active carriage path can cause equipment damage or injury.
Power status during maintenance varies by model. Some printers control the carriage position and maintenance timer while the main power remains on. Others require a different sequence. Use the procedure written for the exact printer.
Clean Only Approved Areas
Depending on the machine, approved maintenance areas may include the sides of the printhead frame, cap top, wiper, wiper cleaner, flushing area, and maintenance-station surfaces.
The nozzle plate is one of the most sensitive components in the printer. Direct rubbing can damage the nozzle surface, push contamination into the nozzle area, or affect droplet direction. Visible ink on the nozzle surface does not automatically mean that it should be wiped. Follow the printer's cleaning diagram and contact limits.
Model-specific procedures can differ substantially. For example, Dacen provides separate information on cleaning an Epson nozzle on an A3 UV printer, while printers using industrial heads or negative-pressure ink systems may require a different workflow. Dacen's Ricoh printhead introduction provides additional background on another printhead category.
Official manufacturer documentation also illustrates why maintenance must be model-specific. Operators can consult the Mimaki UJF-3042MkII e manual library and the Roland DG VersaUV LEF2-300 download center as examples of equipment-specific maintenance resources.
Complete Maintenance Promptly
A printhead should not remain away from the cap longer than necessary. Once cleaning is complete, remove the tools, close the covers, exit maintenance mode, and allow the carriage to return to its parked position.
Run the specified automatic cleaning function, print another nozzle check, and record the result. If the pattern is worse, ink begins to leak, or a new alarm appears, stop the maintenance sequence and request technical support.
UV Printer Troubleshooting: Symptom, Possible Cause, and Next Action
| Symptom | More likely diagnostic direction | Recommended next action |
|---|---|---|
| Missing nozzles remain in exactly the same positions | Fixed contamination, physical damage, cap-sealing failure, or electrical problem | Inspect the maintenance station and stop repeating strong cleaning if there is no improvement |
| Missing positions move between tests | Air, unstable pressure, temporary ink starvation, or intermittent firing | Check ink supply, visible tubing, circulation, alarms, cap, and wiper |
| Several colors become weak together | Shared pressure, pump, cap, waste path, or system-level problem | Check common components before treating each printhead separately |
| White ink becomes weak while CMYK remains normal | White ink sedimentation, circulation, filter, or white ink path restriction | Confirm approved circulation and agitation operation; do not change pressure settings without guidance |
| The printhead drips or weeps ink | Insufficient negative pressure, leaking ink path, damaged damper, sealing problem, or printhead damage | Stop printing and investigate the fluid system; see Dacen's guide to printhead ink-drop problems |
| Persistent bubbles appear in the ink line | Low ink level, loose connection, air leak, degassing issue, pump problem, or pressure instability | Resolve the air source before repeating cleaning; review the discussion of bubbles in a UV printer ink system |
| The nozzle check becomes worse after cleaning | Contaminated cap or wiper, poor seal, disturbed air, incompatible procedure, or developing fluid-system problem | Stop escalating and inspect what changed during the maintenance process |
| The printer starts normally but loses nozzles during a long job | Ink replenishment restriction, filter resistance, air entry, pressure instability, or excessive flow demand | Pause production and request ink-supply diagnosis if basic checks do not identify the cause |
| Lines are deflected rather than completely missing | Contamination near the nozzle area, damaged nozzle surface, or incorrect droplet direction | Avoid treating the issue as simple clogging; inspect approved areas and compare repeated tests |
It is also important to distinguish a blocked nozzle from an interruption elsewhere in the ink path. Dacen discusses this distinction in its article on differentiating nozzle plugging from ink disconnection.
Illustrative Diagnostic Scenario 1: The Same Nozzles Stay Missing
Suppose a nozzle check shows several missing lines in one channel. Normal cleaning changes nothing, and a stronger cleaning cycle produces the same missing positions. In this case, repeating the strongest cleaning is unlikely to provide useful diagnostic information.
The next step is to inspect whether the cap seals evenly, whether the wiper is damaged or contaminated, and whether the printhead has experienced a collision. A defect that remains fixed may also require electrical or physical printhead diagnosis by a service engineer.
Illustrative Diagnostic Scenario 2: The Pattern Deteriorates During Printing
Suppose the nozzle check is acceptable at startup, but nozzles disappear after a long, high-coverage job. Cleaning temporarily restores them, and the problem returns during production.
This pattern points more strongly toward ink replenishment, pressure stability, air entry, filter resistance, or flow demand than toward a permanently blocked nozzle. The diagnostic priority should shift from repeated cleaning to the ink-delivery system.
What to Do After a Printhead Strike?
A head strike can affect the nozzle surface, printhead alignment, carriage mechanics, encoder system, ink connections, and electrical components. Automatic cleaning alone cannot confirm that the printhead is safe.
After a collision:
- Stop the print job and prevent another carriage pass over the object.
- Remove the cause of the collision only after the carriage is in a safe position.
- Inspect for leaking ink, hanging residue, loose fixtures, damaged cables, and visible deformation.
- Print a nozzle check if the printer can operate safely.
- Compare the result with the most recent saved pattern.
- Check for unusual carriage noise, alignment change, or system alarms.
- Request service support if leaking, physical damage, electrical alarms, or persistent nozzle defects are present.
Operator Maintenance Levels
| Level | Responsible person | Typical work |
|---|---|---|
| Level 1 | Trained operator | Nozzle checks, normal cleaning, approved daily cleaning, basic visual inspection, production monitoring, and maintenance records |
| Level 2 | Trained maintenance technician | Scheduled component replacement, approved fluid-system inspection, cap or wiper adjustment, filter or tubing checks, and advanced recovery procedures |
| Level 3 | Supplier or service engineer | Pressure calibration, waveform or electrical diagnosis, printhead replacement, pump diagnosis, major ink-system repair, and post-collision evaluation |
An operator should stop and request technical assistance when the problem involves leaking ink, persistent air, damaged maintenance parts, pressure adjustment, electrical or temperature alarms, carriage collision, abnormal movement, or a nozzle pattern that becomes worse after the approved maintenance sequence.
UV Printer Shutdown and Holiday Maintenance
Downtime care should be planned before the printer stops. Waiting until the restart to address settled ink or dried maintenance components increases recovery time and ink consumption.
Overnight or Normal Non-Production Periods
Complete the end-of-shift routine, confirm that the carriage is capped, and leave the printer in the power state required for automatic maintenance. Check that white ink circulation or agitation remains available when the machine design requires it.
Several Days of Downtime
Before a holiday or multi-day shutdown, print and save a good nozzle check, clean the approved maintenance areas, confirm ink and cleaning-liquid levels, check waste capacity, and verify the scheduled maintenance settings.
Unplugging the printer is not automatically the safest option. Some systems require standby power for capping, circulation, agitation, or periodic cleaning. Dacen provides additional information on maintaining the nozzle after printing is completed.
Extended Storage or Transportation
Long-term storage may require ink discharge, cleaning-fluid filling, tube flushing, printhead preservation, transport locks, carriage securing, or environmental protection. These procedures should normally be planned with the equipment supplier because an incorrect sequence can introduce air, leave incompatible liquid in the system, or allow ink to settle in inaccessible areas.
Restarting after extended storage may also require staged ink filling, circulation, leak inspection, pressure verification, nozzle recovery, and production testing. Do not assume that a printer is ready for normal production immediately after the first acceptable nozzle check.
White Ink Shutdown Precautions
Before downtime, confirm whether automatic white ink circulation must remain active, whether the tank requires an approved preparation procedure, and how the system should be restarted. Advice written for a non-circulating cartridge system may not apply to a bulk-ink or negative-pressure circulation system.
Post-Maintenance Verification Checklist
Maintenance is complete only after the result has been verified. A clean-looking maintenance station does not prove that the printer is ready for production.
- Confirm that all cleaning tools and materials have been removed.
- Check that the cap, wiper, and flushing area are in their correct positions.
- Confirm that the carriage parks and caps normally.
- Check for ink leaks, dripping, abnormal bubbles, or new alarms.
- Run the specified automatic maintenance cycle.
- Print and save a new nozzle check.
- Compare it with the pattern printed before maintenance.
- Print a representative production sample containing solid colors, gradients, fine text, and any required white or varnish layers.
- Inspect for banding, graininess, color-density variation, registration changes, and inconsistent curing.
- Record the maintenance action and final result.
A nozzle pattern that improves briefly and then deteriorates again should not be treated as a completed repair. The repeating pattern is useful evidence of an unresolved supply, pressure, air, or maintenance-station problem.
How to Reduce Future Printhead Problems?
Keep the Production Environment Controlled
Dust, fibers, loose packaging material, cured ink fragments, and airborne contamination can collect around the maintenance station and printhead. Keep consumables covered, clean fixtures regularly, and prevent sanding, cutting, or dusty preparation work from taking place next to the printer.
Use Compatible Ink and Cleaning Fluid
Ink chemistry, viscosity, pigment load, curing behavior, seals, dampers, and printhead materials must be compatible. Mixing unknown inks or cleaning products may cause precipitation, swelling, leakage, unstable jetting, or permanent component damage.
Maintain Fixtures and Product Flatness
A fixture should hold the product flat, stable, and repeatable. Inspect for warped inserts, adhesive buildup, raised screws, loose parts, and worn locating features. Product movement and unexpected height variation are common preventable causes of head strikes.
Keep a Maintenance Log
Record the date, operator, printer model, printhead configuration, ink type, nozzle-check result, cleaning method, defect location, replacement parts, corrective action, and final test result.
A sequence of saved nozzle checks is often more useful than a verbal description. It shows whether a defect is fixed, random, progressive, related to inactivity, or triggered by production.
Train More Than One Operator
Document the approved routine and train backup operators. Maintenance quality should not depend on undocumented habits known by only one employee.
Information to Send to Technical Support
A complete support request allows the technician to distinguish a routine maintenance issue from a fluid, mechanical, electrical, or printhead problem.
Provide:
- Printer model and serial number
- Printhead model and ink configuration
- Ink and cleaning-fluid information
- Date and operating condition when the problem started
- Clear images of the nozzle checks before and after cleaning
- Photos of the cap, wiper, flushing area, and visible tubing
- Cleaning procedures already performed
- Error messages and alarm codes
- A short video when leaking, ink movement, carriage motion, or abnormal sound is involved
- Details of any recent head strike, transport, ink change, maintenance-part replacement, or long shutdown
When an approved maintenance sequence does not restore stable nozzle performance, contact Dacen technical support instead of continuing to repeat powerful cleaning cycles.
Frequently Asked Questions
Q: How Often Should a UV Printer Printhead Be Cleaned?
A: Print a nozzle check before production and clean when the test pattern, machine notification, or maintenance schedule indicates that cleaning is needed. Automatic printhead cleaning should not be performed repeatedly without checking the result between cycles.
The maintenance station may need daily or weekly attention even when the nozzle check is acceptable, especially in high-volume, dusty, high-gap, or heavy-white-ink production.
Q: Can I Clean a UV Printhead with Alcohol?
A: Alcohol should not be used on the printhead unless the printer manufacturer explicitly approves it for that component. A solvent permitted for a UV-LED window or an exterior surface may damage the nozzle plate, cap, seals, dampers, adhesives, or ink system.
Q: Should I Wipe the Nozzle Plate Directly?
A: Not as a general maintenance rule. Many maintenance procedures instruct operators to clean around the printhead while avoiding direct rubbing of the nozzle surface. Use the diagram and contact method specified for the exact printhead and printer.
Q: How Many Cleaning Cycles Should I Run?
A: There is no universal number. Run one approved cleaning cycle, print another nozzle check, and evaluate the change. If the same defects remain after the approved escalation sequence, inspect the maintenance station and ink system rather than continuing indefinitely.
Q: Why Do the Same Nozzles Keep Disappearing?
A: A defect that remains in the same position may indicate persistent contamination, poor cap sealing, physical nozzle damage, or an electrical issue. A defect that moves between tests is more likely to involve temporary firing instability, air, ink supply, or pressure variation.
Q: Why Does the Nozzle Check Get Worse After Cleaning?
A: Possible causes include a contaminated cap or wiper, a poor cap seal, air disturbed during cleaning, incorrect maintenance technique, or an emerging ink-supply problem. Stop escalating the cleaning level until the cause has been investigated.
Q: Should I Turn Off My UV Printer During a Holiday?
A: Use the printer-specific holiday procedure. Some machines should remain in standby so that automatic maintenance and white ink circulation can continue. Longer shutdowns may require a controlled ink-preservation or flushing procedure.
Q: Does a Missing Nozzle Mean the Printhead Is Damaged?
A: No. Missing nozzles can result from contamination, poor capping, a dirty wiper, air, ink starvation, pressure instability, settled white ink, or maintenance-station problems. Physical or electrical damage becomes more likely when the same positions remain missing after correct maintenance or after a head strike.
Final Maintenance Principle
Reliable UV printer printhead maintenance depends on consistency and diagnosis rather than cleaning force. Start with a nozzle check, determine whether the defect is fixed or changing, inspect the maintenance station and ink system, and escalate only when the previous step has been evaluated.
The most important point is knowing when routine operator maintenance has reached its limit. Persistent defects, leaking ink, pressure problems, electrical alarms, damaged components, and post-collision symptoms require technical diagnosis. A saved nozzle-check history, maintenance log, and clear photographs will make that diagnosis faster and more accurate.